How to Set Up the Sucuri Firewall & Website Monitoring
Introduction
Welcome to Sucuri! In order to have the most effective and accurate results, every new user must complete some basic steps to ensure their website monitoring and protection is configured properly.
The intention of this guide is to focus on the essential steps to set up your website with Sucuri so you can have peace of mind for your digital assets.
Contents
1
Set Up Website Monitoring
Sucuri offers both remote website and server side monitoring. Once these are properly set up, we will scan your website externally and internally for indicators of compromise. You’ll also receive weekly and monthly reports and have access to audit logs.
Our malware monitoring identifies the following:
- Obfuscated javascript injections
- Cross-site scripting
- Website defacements
- Hidden & malicious iframes
- PHP mailers
- Phishing attempts
- Malicious redirects
- Backdoors
- Drive-by downloads
- SEO blackhat spam
In order to begin monitoring activation, we must first add your website to the monitoring dashboard.
Get help with set up.
Looking for help setting up security for your website? Our pros are here to assist you 24/7!
1.1 Add Your Site to the Remote Scanner
These scans are unique in their efficiency. They have the capacity to camouflage themselves as a visitor in order to spot conditional malware via source code. It checks what hundreds of different visitors might see when they access your site.
To set up remote scanning in the Sucuri dashboard:
- Log into your Sucuri account: https://login.sucuri.net/login/
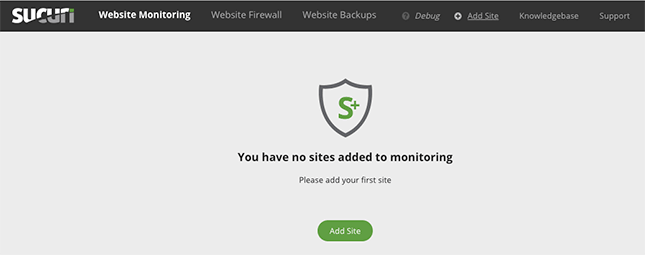
- On the Website Monitoring tab, click Add Site.
- Enter your website URL. You can also add multiple sites by adding one per line.
- Click Add Sites.
The remote scanner will begin automatically scanning your website. This can take up to one hour to complete.
1.2 Enable the Server Side Scanner

Server-side scanning, unlike the remote scanner, has access to scan your website file server. Not all website content is easily visible from the outside. Many website infections hide in your file system and never present themselves to visitors, such as DDoS and mailer scripts.
The server side scanner also tracks file changes, giving you an audit trail of your website file changes. Click Audit Logs for more information.
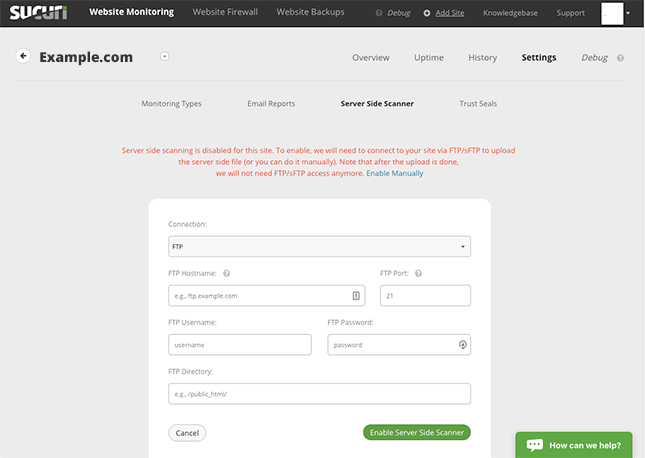
To set up server-side scanning in the Sucuri dashboard:
- Log into your Sucuri account: https://login.sucuri.net/login/
- On the Website Monitoring tab, click Settings.
- Click Server Side Scanner.
- Under Connection, click the drop-down arrow and choose SFTP.
- Type your SFTP username, password, and directory.
The SFTP Port is 22 (21 for FTP – we do not recommend using unencrypted FTP). - Click Enable Server Side Scanner.
If you get an error, you can follow the steps to enable the server side scanner manually by uploading a PHP file to the root of your website.
At this point, your Overview page for Monitoring should be clear of warnings. Your website is completely set up for monitoring once server-side scanning enabled!
1.3 Website Monitoring Overview
We offer many types of website monitoring. In addition to scanning your site externally and internally for malware infections, we also monitor blocklist authorities, your SSL certificate, and DNS records for unauthorized changes.
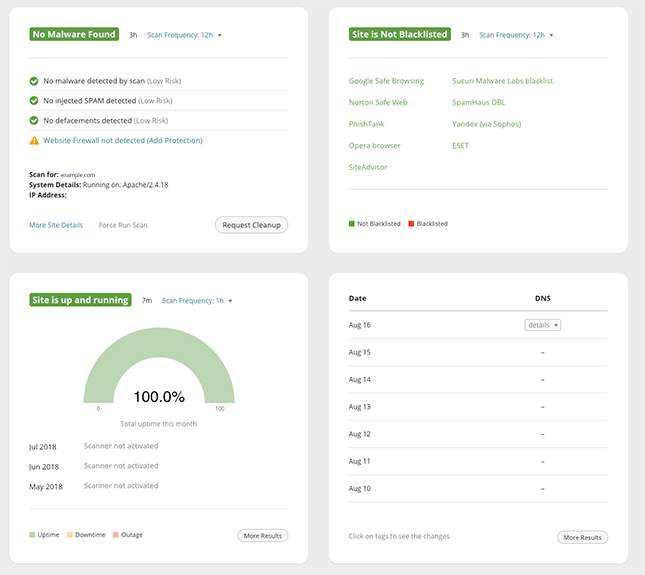
The Website Monitoring Overview will show security status and warnings:
Top left: Any warnings for malware found through our scans, injected spam, or defacements.
Top right: If your site has been blocklisted and by which blocklisting authority.
Bottom left: If your site is running properly, or if there’s been downtime or outages.
Bottom right: If there have been any changes to your DNS records and/or SSL certificate (SSL monitoring is not available on Basic plan).
1.4 Monitoring Types & Frequency
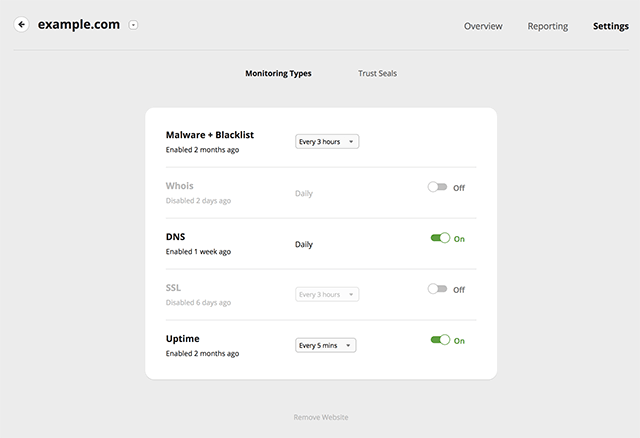
After adding your sites to our monitoring, you can choose which monitoring types you want and the monitoring frequency.
To change monitoring types and frequency follow these steps:
- Log into your Sucuri account: https://login.sucuri.net/login/
- On the Website Monitoring tab, select your website.
- Click Settings > Monitoring Types
- Toggle On/Off switch to activate or deactivate monitoring types.
- Click the drop-down menus choose the scanning frequency.
1.5 Modify Global Alert Options
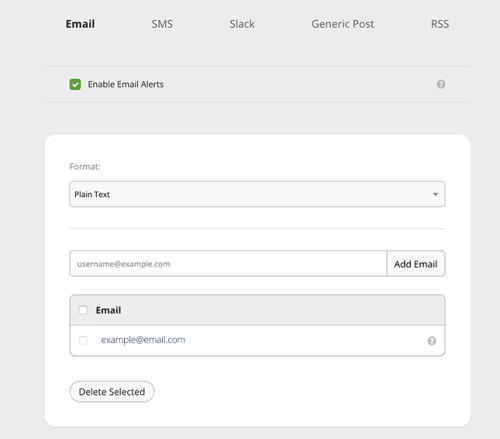
Sucuri Website Monitoring provides the components you need to oversee your website security. By default, the email address you used to sign up with receive alerts. You can add other email addresses and set up alerts via SMS, Slack, and more.
To modify your alert options:
- Log into your Sucuri account: https://login.sucuri.net/login/
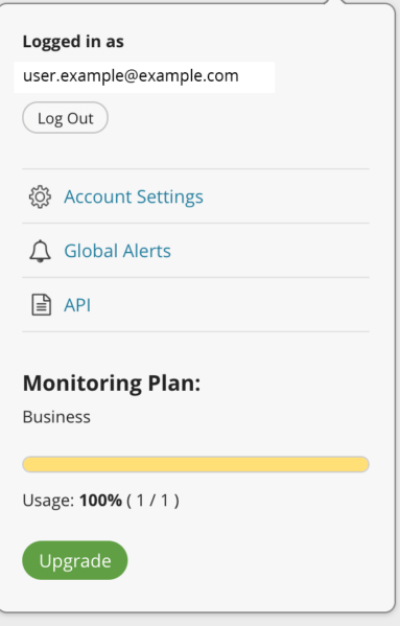
- Click your profile icon in the top right corner.
- Click Global Alerts
- In the Email section, you can add email addresses to receive alerts.
- Select the sections for SMS, Slack, Generic Post, or RSS to set up additional alert types.
2
Set up the Sucuri Website Firewall
The Sucuri Firewall is a cloud-based WAF that stops website hacks and attacks. It is that protective layer that sits between your server and the visitor’s browser.
Here is a list of some of the top evolving threats we mitigate:
- Brute force attempts
- Vulnerability exploitation
- DDoS attacks
- SQL injections
- XSS
- LFI/RFI
- Zero-day exploits
The Sucuri Firewall includes a CDN built on our global network of secure data centers. This is automatically enabled when you activate the firewall and makes your site faster across the world.
2.1 Generate a Firewall IP
Before you activate the firewall, you need to add your website to our firewall network and generate a firewall IP.
After our network has downloaded copies of your website content, you can switch your DNS (www.example.com) to point to your new Sucuri Firewall IP.
To generate your Firewall IP from the Sucuri dashboard:
- At the top, click Website Firewall.
- Click Protect My Site Now.
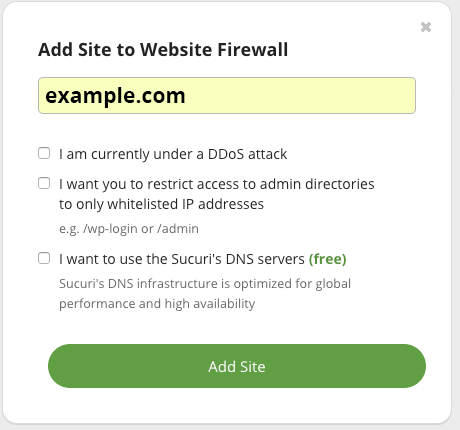
- Type your website URL and select from the checkbox options below
- I am currently under a DDoS attack: This option is for emergencies only, if your website is down due to DDoS.
- I want you to restrict access to admin directories to only allowlisted IP addresses – if you use a CMS like WordPress or Drupal, this feature automatically restricts the admin area to allowlisted IP addresses.
- Click Add Site.
Caution
Your website is not protected yet! You must continue with the following steps to complete activation. If you need help with this, please contact our support team.
2.2 Test the Internal Domain
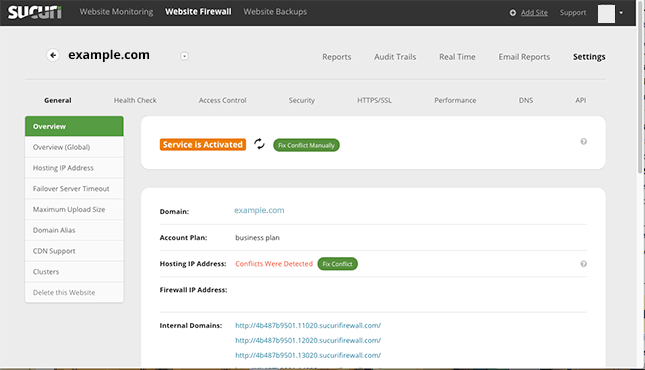
After adding your website to the firewall network, you will see a warning that the Service is Not Activated. Now that the firewall is caching your website content, test the internal domain to make sure they working.
Firewall Not Activated Warning

To test the internal domain after adding your site to the firewall network:
- Scroll to the first step of the Activating Website Firewall Instructions.
- Click all the links under Internal Domains.
- If you see an error message, you may need to wait a few minutes and try again.
- Once your website is visible on the internal domains, you can proceed to activate the firewall.
Firewall is Activated
Note
If HTTPS is activated on your site, you won’t be able to test. Please temporarily disable forcing HTTPS if you need to test this.
2.3 Activate Your Website Firewall Protection
Activating the firewall means changing your DNS (example.com) to your new Firewall IP. This allows Sucuri to filter malicious traffic before allowing legitimate visitors to access your website.
We offer a few different options to activate the firewall:
- Automatic Integration with cPanel/Plesk.
- Use Sucuri DNS manager.
- Manually change DNS records.
We included instructions below for each option.
Automatic Integration with cPanel/Plesk
To activate the firewall using cPanel or Plesk:
- Click I use cPanel or I use Plesk button under Automatic Integration.
- Enter your domain, username, and password.
- Click the Login to Plesk or Login to cPanel buttons.

Caution
If you decide to remove the firewall, you must change your DNS record(s) back to its original IP address.
Manually Change DNS Records
To manually change your DNS records:
- Scroll to the second step of the Activating Website Firewall Instructions.
- Copy the the second IP address in the grey box. Log into your host or registrar to access the DNS records for your domain.
- We have instructions for several popular hosts in our KB article.
- Change the A Record as instructed in the grey box.
Note
It can up to 48 hours for DNS propagation. Until all DNS servers worldwide recognize that your website is pointing to the firewall IP, you will not be fully protected.
If you have any trouble activating the firewall, please submit a support ticket with your cPanel/Plesk or hosting account login information.
Firewall Protection When You Need It Most
All platform plans include a web application firewall to block attacks and virtually patch known vulnerabilities.
2.4 Allowlist Firewall IP
If you have a firewall on your hosting server, such as CSF or ModSecurity, we recommend that you allowlist Sucuri IP addresses listed in the fourth step of the Activating Website Firewall Instructions.
Allowlisting the Sucuri IP addresses in your server firewall will ensure we are able to cache your website content without being blocked.
If you are not sure whether you have additional firewalls on your server, you can contact your host and send them the IP addresses to allowlist.
2.5 Upload Your SSL Certificate
If you do not have an SSL certificate for your website, you can skip this step.
By default, the Sucuri Firewall offers free Let’s Encrypt certificates on your Firewall IP. To ensure end-to-end encryption, you can upload your certificate.
To upload your SSL certificate:
- Click HTTPS/SSL
- Click Upload Certificate
- Paste the content of your .key and .crt files in the fields provided.
- Click Save.
Note
If you use the Basic plan, you need to upgrade to Professional or higher to use a custom SSL certificate with our firewall.
2.6 Prevent Firewall Bypass
Once the DNS changes have been fully propagated (which you can test here), all traffic going to your domain (www.example.com) will be passing through the Sucuri Firewall.
If an attacker knows your hosting IP address, they can bypass the Sucuri Firewall because they are not entering your website using the domain (www.example.com).
The best way to prevent this from happening is to limit access to your hosting server so that only the Sucuri Firewall can access it.
To restrict access to your website IP address:
- In the Sucuri dashboard, click Settings > Security.
- Select the proper server for your hosting configuration.
- Add the code to your server configuration file.
3
Enable Website Backups
No matter what you do to secure your website, the risk will never be zero. If your website functionality is damaged, you need a way to recover. For only $5/month, our cloud-based backup system ensures you are protected in the event of a critical failure.
Here are a few of the benefits in adding our Sucuri Website Backup Solution:
- Backup site files and database remotely via FTP or SFTP
- Auto restore by date
- Ability to exclude unnecessary directories
- Set frequency ranging from daily, weekly, or monthly
- Ability to schedule time of backups to reduce server load
- Track file changes including how many files were added, updated or removed
- Incremental backups of only modified or added files
- Backups are retained for 90 days
3.1 Activate Sucuri Backups
To activate Sucuri backups:
- Log into your Sucuri account: https://login.sucuri.net/login/
- On the Website Backup, click Add Site.
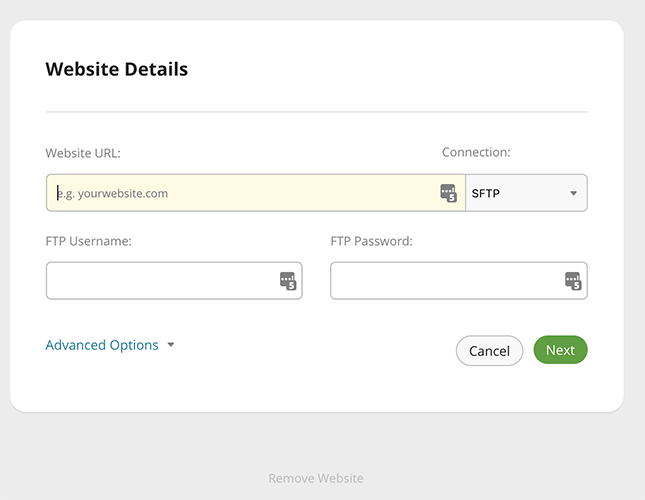
- Next, you will be asked to add your website URL and (s)FTP credentials in the Website Details. The system will attempt to detect the database automatically.
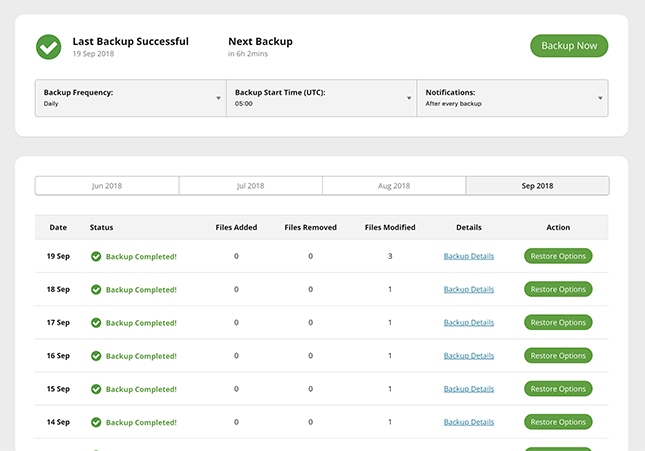
Depending on the amount of files, the process of backing up may take some time. While the backup is in progress, you have the option to go to the next step and adjust your settings.
Activate Backups

Last Backup Successful
Note
If you have any trouble activating backups, please open a support ticket with your cPanel/Plesk or hosting account login information.
3.2 Adjust Backup Settings
Here is a list of the options you can adjust for setting up the details behind how backups occur and how you are to be notified.
- At the top, you will know when the last successful backup occurred, when the next backup will take place, or click the Backup Now button to begin a new backup
- Backup Frequency – daily, weekly, or monthly
- Backup Start Time – is set to an hourly UTC (Universal Time Coordinated)
- Notifications – choose when to be notified of a backup in progress
- After each backup
- Only on failure
- Disable notifications
Below, you will see a monthly status of how many backups have been done.
3.3 Restoring Website Files from Backups
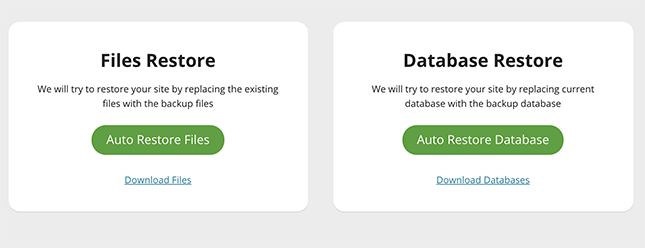
If something happens, you can automatically restore your website files individually, or all at once.
To restore your website file backup from the Sucuri dashboard:
- Navigate to the Website Backups section.
- Choose the site you want to restore.
- Click Restore Options next to the dated backup you wish to restore.
- To download files to restore manually, click Download Files.
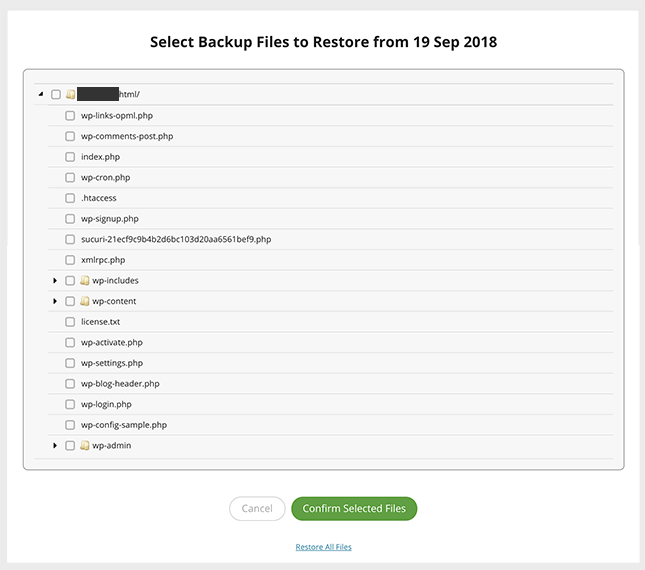
- Select individual files or scroll to the bottom to Download All Files.
- Click Confirm Selected Files.
- Choose to email or save the files directly and click Generate Zip.
- To restore files automatically, click Auto Restore Files.
- Select individual files and click Confirm Selected Files or scroll to the bottom to Restore All Files.
- Check the box that says I agree with overwriting the files.
- Click Restore.
When restoring your files, the website backup server will overwrite your existing files with the one from the backup date you have selected. Depending on the size of your website, this can take several minutes. On your dashboard, you will see that the restoration is complete. As well, an email will be sent.
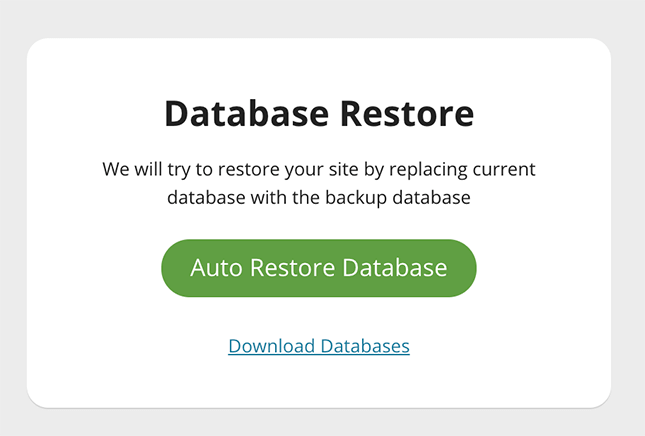
3.4 Restoring Database from Sucuri Backups
If something happens to your website, you can automatically restore your website databases.
To restore your database backup from the Sucuri dashboard:
- Navigate to the Website Backups section.
- Choose the site you want to restore.
- Click Restore Options next to the dated backup you wish to restore.
- To download files to restore manually, click Download Databases.
- Select the database you wish to download from the drop-down menu.
- Click Download.
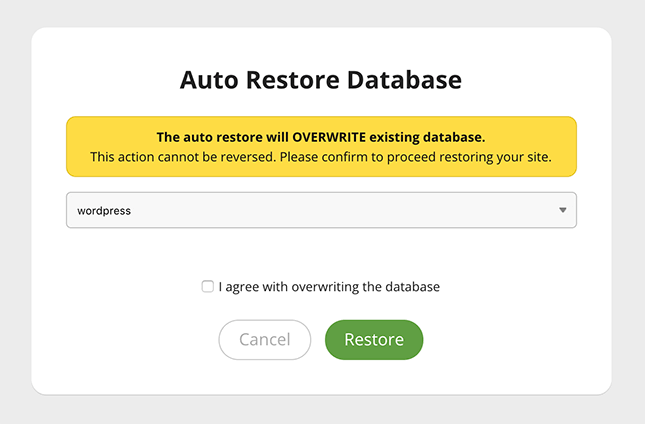
- To restore the database automatically, click Auto Restore Database.
- Select the database you wish to restore from the drop-down menu.
- Click Download to save the file to your computer.
- Check the box that says I agree with overwriting the database.
- Click Restore.
When restoring your database, the website backup server will overwrite your existing database with the one from the backup date you have selected. Depending on the size of your website, this can take several minutes. You will receive an email once the database restoration has been completed.
Did you know?
Sucuri offers an affordable system for secure website backups. Recover and restore your website in a few clicks.
4
Getting Website Security Support
There are two ways to get support – chat and ticket system.
Tickets are worked on in the order they are received. However, each ticket is handled personally by one of our analysts! Once someone has finished working on your case, you will be provided with an update via the ticket system. This message will also reach you via email.
Caution
The following recommendations are for server administrators with a working knowledge of these files. If you do not feel comfortable with the suggestions provided below, we recommend using a website firewall that includes virtual hardening instead.
4.1 How to Access General Support
Our Product Support Team primarily assists clients with any issues 24/7/365 via chat while also providing assistance with email inquiries at various stages of the customer lifecycle.
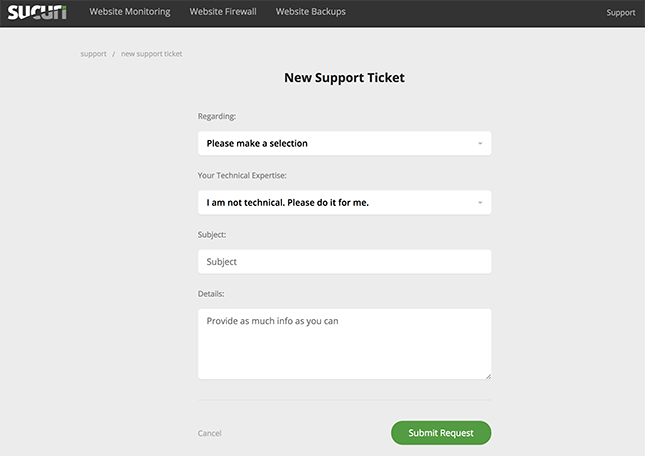
To submit a general new support ticket:
- Log in to the Sucuri dashboard: https://support.sucuri.net/support/
- At the top right, click Support
- Select the Product Support tab
- Click New Ticket
- Fill in the ticket information:a. Select an issue type
- Select your technical expertise level
- Type a subject line
- Type details about the issue
- Click Submit Request
New Ticket Request
4.2 How to Submit a Malware Removal Request
If your site is currently under attack or has been hacked, this is when a malware removal request is needed.
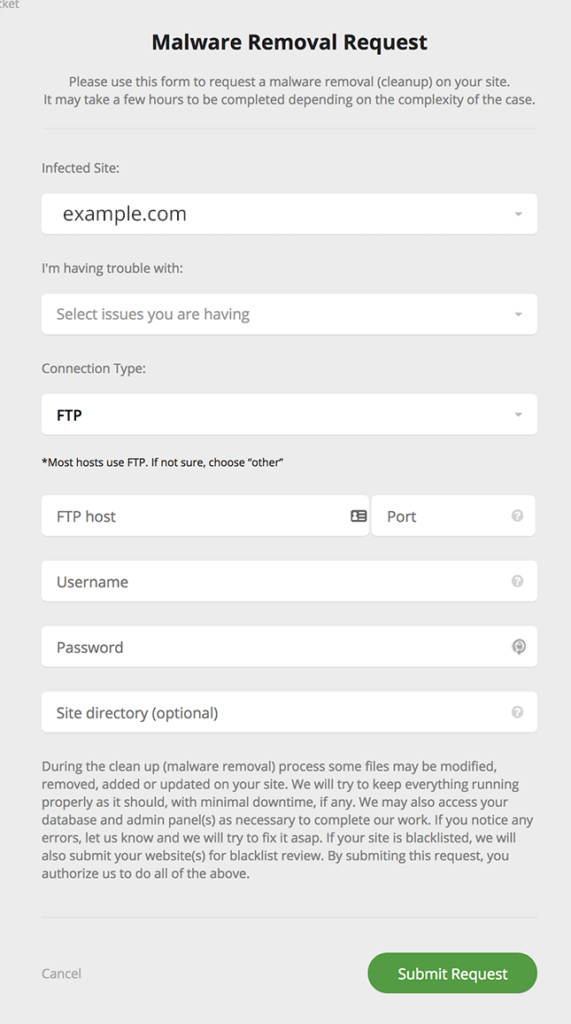
To submit a malware removal request ticket:
- Log in to the Sucuri dashboard: https://support.sucuri.net/support/
- Click Support
- Select the Malware Removal Request tab (note: Your ticket history will appear on this page as a reference)
- Click on New Malware Removal Request.
- Enter your FTP information so we can begin working on your site.
Our analysts will respond quickly to your request. The time in which it takes to remediate the issue is based upon the service level agreement (SLA) of your plan. Our plans have response time increments of 4 hours, 6 hours, and 12 hours (as well as custom plans for enterprise).
Malware Removal Request
Note
Once we receive your ticket, we will begin scanning your website. Regular updates will be sent to you via email and will appear on your dashboard under the Support section in the upper right-hand corner of your Sucuri account.
Note
SLA is based on response time, not resolution. It is difficult to estimate resolution time due to the complexities of various infections and attacks. If at any time the current plan is not meeting your needs, you can upgrade to another plan.
Warning
4.3 How to Access Customer Chat
Chat with our team any time during business hours. You can access a full-page version of live chat here.
Simply let the sales team know you are a customer looking for help and they will pass you to our product support team for assistance.
Sucuri Resource Library
Say on top emerging website security threats with our helpful guides, email, courses, and blog content.

